
Introduction to Twisted Delight: Homemade Soft Pretzels
Welcome to the delightful world of homemade soft pretzels! If you’ve ever experienced the joy of biting into a warm, chewy pretzel, you know just how irresistible they can be. Our Twisted Delight recipe brings the essence of this iconic snack right into your kitchen, allowing you to create soft pretzels that are not only delicious but also perfect for any occasion. Whether you’re hosting a gathering, cheering for your favorite team on game day, or simply craving a comforting treat at home, this recipe will guide you through the process of making the perfect soft pretzels.
Soft pretzels have a rich and fascinating history, originating in ancient times. They are believed to have been created by monks in Europe as a way to celebrate the end of Lent. Traditionally, these pretzels were made from simple ingredients like flour, water, and salt, shaped into knots, and baked to perfection. Over the years, they have evolved into the beloved snack we enjoy today, often found at street carts, festivals, and bakeries around the world. However, making them from scratch allows you to appreciate their warm, chewy goodness in a whole new way.
In this comprehensive guide, we’ll walk you through the entire process of making soft pretzels, from selecting the right ingredients to enjoying your freshly baked treats. You’ll learn about the essential components that make up the dough, the importance of each step in the preparation process, and tips for achieving the best results. Let’s get started on this delicious journey!
Understanding the Ingredients
The foundation of any great pretzel lies in its ingredients. Each component plays a vital role in achieving the perfect texture and flavor. Let’s break down what makes each ingredient essential for your pretzel-making adventure.
The Role of All-Purpose Flour
All-purpose flour is the backbone of your pretzel dough. Its protein content is crucial for developing gluten, which provides the structure and chewiness characteristic of soft pretzels. When flour is mixed with water, the proteins in the flour absorb moisture and begin to form gluten strands. The right amount of gluten development is key to achieving that desirable chewy texture.
For our Twisted Delight recipe, we recommend using high-quality all-purpose flour. While bread flour could also be used due to its higher protein content, all-purpose flour strikes a perfect balance for soft pretzels, allowing them to rise beautifully while still maintaining a tender bite.
Active Dry Yeast: The Secret to Softness
Yeast is the magic ingredient that transforms a simple mixture of flour and water into a delightful soft pretzel. Active dry yeast works through a process known as fermentation. When activated with warm water and sugar, the yeast begins to consume the sugars present in the dough, producing carbon dioxide gas. This gas is what causes the dough to rise, creating air pockets that contribute to the light and fluffy interior of your pretzels.
Understanding how yeast works is crucial. Always check the expiration date of your yeast, and make sure to activate it properly. If the yeast foams and bubbles when mixed with warm water and sugar, you’re on the right track. This activation not only helps the dough rise but also adds a subtle depth of flavor to your pretzels.
The Importance of Warm Water
Water is another vital component in your pretzel dough. The temperature of the water used to activate the yeast is crucial. Ideally, you want the water to be warm but not hot—around 110°F (43°C) is perfect. Water that is too hot can kill the yeast, while water that is too cold may not activate it effectively.
Using warm water helps to create an ideal environment for the yeast to thrive, ensuring that your dough rises sufficiently. The moisture from the water also aids in gluten formation, allowing your pretzels to develop the right structure and texture as they bake.
Sugar and Salt: Balancing Flavors
Sugar and salt play an integral role in the flavor profile of your soft pretzels. Sugar not only enhances the sweetness of the dough, but it also serves to feed the yeast during fermentation, promoting a more vigorous rise. This results in a pretzel that is not only soft but also has a slightly sweet undertone that complements the salty exterior.
Salt, on the other hand, is essential for enhancing flavor. It helps to balance the sweetness of the dough and provides a delicious contrast to the soft interior. When making pretzels, aim for a balance of sugar and salt to create a harmonious flavor that will leave your taste buds satisfied.
Baking Soda Bath: The Key to That Signature Crust
One of the defining characteristics of soft pretzels is their unique crust, achieved through a baking soda bath prior to baking. This step may seem unusual, but it is crucial for developing the pretzels’ signature color and texture.
When pretzels are immersed in a baking soda solution, the alkaline properties of the soda react with the dough, resulting in a beautiful golden-brown crust. This reaction also contributes to the chewy texture that soft pretzels are known for. To create the baking soda bath, simply dissolve baking soda in boiling water and immerse your shaped pretzels for a brief period before baking. This process not only enhances the appearance but also improves the overall flavor of the pretzels.
Step-by-Step Instructions for Making Soft Pretzels
Now that you understand the importance of each ingredient, it’s time to dive into the step-by-step process of creating your homemade soft pretzels. Follow these detailed instructions to ensure that your pretzel-making experience is smooth and rewarding.
Activating the Yeast: A Crucial First Step
The first step in making your soft pretzels is to activate the yeast. This process is essential for ensuring that your dough rises properly.
1. Gather Your Ingredients: In a small bowl, combine 1 packet (2 ¼ teaspoons) of active dry yeast with 1 teaspoon of sugar. This sugar will feed the yeast and promote its activation.
2. Add Warm Water: Pour in ½ cup of warm water (around 110°F or 43°C) and stir gently. Allow the mixture to sit for about 5 to 10 minutes. You’ll know the yeast is ready when it becomes frothy and bubbles form on the surface. This indicates that the yeast is alive and ready to work its magic in your dough.
Mixing the Dough: Creating a Unified Mixture
Once your yeast is activated, it’s time to mix the dough. This step involves combining all of your ingredients to form a cohesive mixture.
1. Combine the Dry Ingredients: In a large mixing bowl, add 4 cups of all-purpose flour and 1 teaspoon of salt. Whisk them together to ensure they are well combined.
2. Add the Yeast Mixture: Make a well in the center of the flour mixture and pour in the activated yeast mixture.
3. Mix the Dough: Using a wooden spoon or your hands, gradually incorporate the flour into the liquid until a shaggy dough begins to form.
4. Knead the Dough: Once the dough has come together, transfer it to a lightly floured surface. Knead the dough for about 8 to 10 minutes until it becomes smooth and elastic. You’ll know it’s ready when it springs back slightly when pressed.
Kneading the Dough: Achieving the Perfect Texture
Kneading the dough is a crucial step that helps develop gluten, giving your pretzels their characteristic chewiness.
1. Knead with Purpose: Use the heel of your hand to push the dough away from you, fold it over, and repeat this process. If the dough is sticking to your hands or the surface, sprinkle a little more flour as needed.
2. Test for Consistency: After kneading, the dough should be soft, smooth, and slightly tacky but not overly sticky. If it feels too dry, you can add a small amount of water; if too sticky, sprinkle a bit more flour.
The First Rise: Building Flavor and Volume
The first rise is where the dough truly comes to life. During this period, the yeast ferments, developing flavor and increasing the dough’s volume.
1. Prepare for Rising: Once kneaded, shape the dough into a ball and place it in a lightly greased bowl. Cover the bowl with a clean kitchen towel or plastic wrap to retain moisture.
2. Let It Rise: Place the bowl in a warm, draft-free area and allow the dough to rise for about 1 to 1.5 hours, or until it has doubled in size. This rising time is essential for achieving that soft and airy texture in your pretzels.
As you embark on the journey to create your homemade soft pretzels, remember that patience is key. Each step in the process contributes to the final product, and understanding the role of each ingredient will enhance your baking experience. With this knowledge, you’ll be well on your way to mastering the art of soft pretzel making. Stay tuned for the next part, where we’ll guide you through shaping, boiling, and baking your Twisted Delight pretzels to perfection!
Letting the Dough Rise: The Key to Softness
The first crucial step after mixing your pretzel dough is allowing it to rise. This process is vital as it impacts the texture and flavor of your final product. When yeast is activated, it ferments the sugars in the dough, producing carbon dioxide gas that causes the dough to expand.
What to Look For: You should let the dough rise in a warm area, covered with a damp cloth or plastic wrap, for about 1 to 2 hours. The dough should double in size and feel airy to the touch. A well-risen dough will yield soft pretzels with that characteristic chewy texture. If you poke the dough, it should slowly spring back, indicating that it’s ready for the next step.
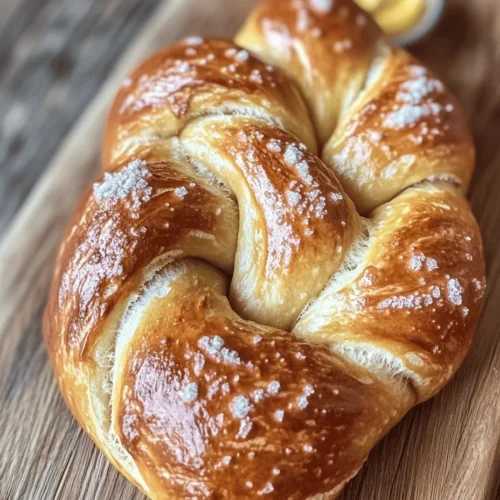
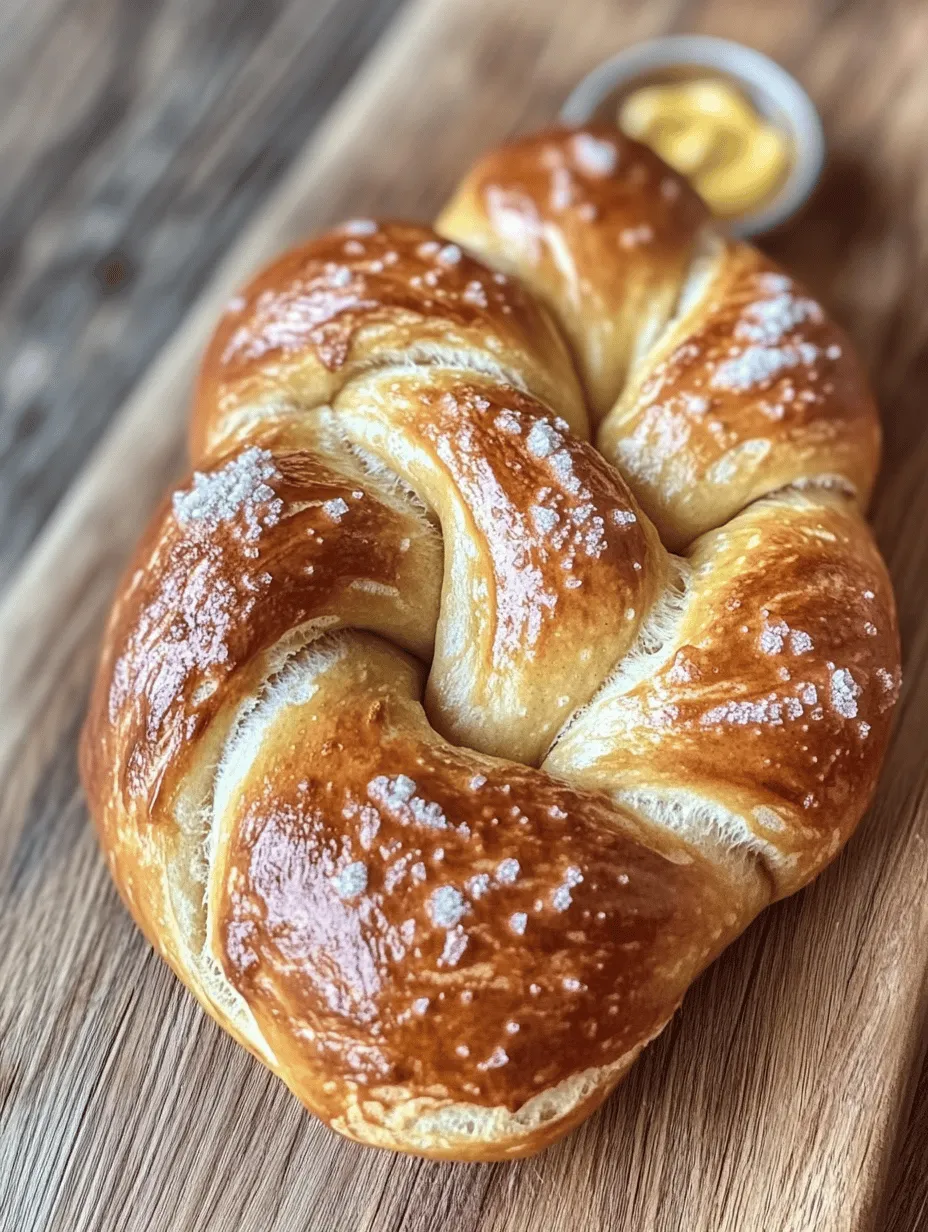
Shaping the Pretzels: Crafting Twisted Delights
Shaping your pretzels is where the magic happens. Here’s a detailed guide on how to twist and shape your pretzels into those iconic forms.
1. Divide the Dough: Once your dough has risen, punch it down gently to release the air. Turn it out onto a lightly floured surface and divide it into 8 equal portions.
2. Roll Out the Dough: Take one piece of dough and roll it into a long rope, about 24 inches in length. Keep it uniform in thickness, aiming for about ½ inch wide. If the dough resists, allow it to rest for a minute before continuing to roll.
3. Form the Pretzel Shape: To create the classic pretzel shape:
– Form the rope into a U.
– Cross the ends over each other to create a twist.
– Bring the twisted ends down toward the bottom of the U, pressing them into the dough. Ensure they stick well to maintain the shape during baking.
4. Repeat: Repeat this process with the remaining pieces of dough, placing each shaped pretzel on a parchment-lined baking sheet.
The Baking Soda Bath: A Step Not to Skip
The baking soda bath is a defining moment in your pretzel-making process. It not only helps develop the characteristic brown crust but also enhances the flavor.
1. Prepare the Bath: In a large pot, bring 10 cups of water to a gentle boil, then carefully add ⅔ cup of baking soda. Be cautious, as the mixture may bubble up. Stir until the baking soda is fully dissolved.
2. Dipping the Pretzels: Working in batches, dip each shaped pretzel into the baking soda bath for about 30 seconds. This step is crucial as it creates the pretzel’s unique flavor and texture. Use a slotted spoon to remove the pretzels, allowing any excess liquid to drip off before placing them back on the baking sheet.
Applying Egg Wash and Salt: The Finishing Touches
An egg wash is essential for achieving that golden-brown finish on your pretzels, while salt enhances their flavor.
1. Prepare the Egg Wash: In a small bowl, whisk together one egg and a tablespoon of water until well combined.
2. Brush the Pretzels: Use a pastry brush to apply a generous layer of egg wash over each pretzel. This not only gives them a beautiful sheen but also helps the salt adhere.
3. Sprinkle with Salt: After applying the egg wash, sprinkle coarse salt evenly over the pretzels. Aim for a balance; too much salt can overpower the flavor, while too little can leave them bland.
Baking to Perfection: Timing and Temperature
Now it’s time to bake your pretzels to golden perfection. Preheat your oven to 425°F (220°C) and prepare for the delightful aroma that will soon fill your kitchen.
1. Baking Time: Place the pretzels in the oven and bake for 12-15 minutes or until they are deep golden brown. Keep a close eye on them, as baking times may vary depending on your oven.
2. Checking Doneness: To check if your pretzels are done, they should have a shiny golden crust and a hollow sound when tapped on the bottom. If they appear too light, give them a couple more minutes.
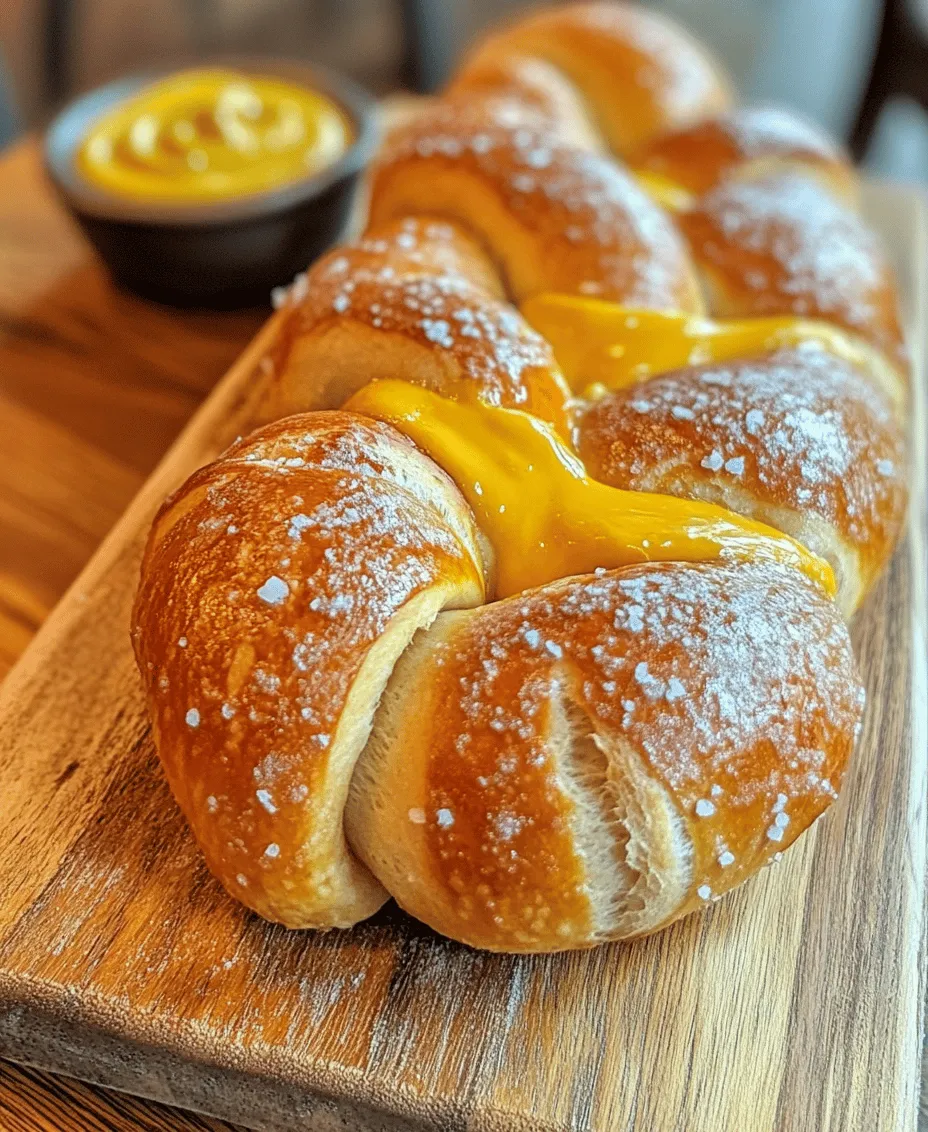
Serving Suggestions and Pairings
Once your pretzels have cooled slightly, it’s time to enjoy them! Here are some serving suggestions that will elevate your soft pretzel experience.
Classic Dipping Sauces
Soft pretzels are perfect for dipping. Here are a few classic options:
– Mustard: A tangy mustard pairs excellently with pretzels. You can opt for yellow mustard for a classic taste or go for a spicy brown mustard for an extra kick.
– Cheese Sauce: A warm, gooey cheese sauce is a favorite among pretzel lovers. You can easily make a simple cheese sauce using cheddar cheese, milk, and a bit of flour to thicken.
– Sweet Options: For a dessert twist, consider a chocolate sauce or caramel dip. These sweet options contrast beautifully with the salty pretzel.
Creative Toppings and Variations
Feel free to experiment with your pretzels! Here are some creative variations to consider:
– Herb-Infused Pretzels: Mix dried herbs such as rosemary or thyme into the dough for a fragrant twist.
– Cheese-Stuffed Pretzels: Incorporate small cubes of cheese into the center of your pretzel before shaping for a cheesy surprise in every bite.
– Spicy Pretzels: Add a pinch of cayenne pepper or crushed red pepper flakes to the dough for a spicy kick.
The Cultural Significance of Pretzels
Understanding the rich history of pretzels adds depth to your enjoyment of this classic snack.
Origin of Pretzels
Pretzels are believed to have originated in ancient Rome, where they were made of simple dough and shaped to resemble arms crossed in prayer. They eventually made their way to Germany, where they took on their iconic twisted form. The name “pretzel” is derived from the German word “brezel,” and they have become a staple of German cuisine.
Regional Variations
Across the globe, pretzels are enjoyed in various forms. In Germany, you’ll find soft pretzels served at festivals and beer gardens, often paired with mustard. The United States has popularized the soft pretzel as a street food staple, often enjoyed hot with toppings like cinnamon sugar. Each culture has embraced the pretzel, adding its unique flair to this beloved snack.
Conclusion: Enjoying Your Homemade Soft Pretzels
Making homemade soft pretzels is a rewarding experience that brings joy to both the cook and those who get to enjoy the final product. The process of kneading, shaping, and baking your pretzels is not just about creating a snack; it’s about creating memories and sharing a delicious treat with friends and family.
As you savor each bite of your warm, soft pretzels, take a moment to appreciate the flavors and the effort that went into crafting them. Whether you’re enjoying them with a classic mustard dip, a cheesy sauce, or experimenting with creative toppings, the satisfaction of knowing you’ve created something special in your own kitchen is unparalleled. So gather your loved ones, share your pretzels, and relish in the joy of this timeless treat.