
Introduction
There’s something undeniably delightful about the aroma of freshly baked soft pretzels wafting through the kitchen. These golden-brown, chewy snacks are more than just a staple at fairs and sporting events; they are a symbol of comfort and indulgence that can be easily recreated at home. The joy of crafting your own soft pretzels lies not only in the warm, doughy goodness but also in the satisfaction of pairing them with a luscious, cheesy dip that elevates the experience to a whole new level. Whether you’re hosting a game night, planning a cozy family dinner, or simply craving a snack, homemade soft pretzels with cheesy bliss are the perfect treat.
Making snacks from scratch is not only about taste; it’s also about health. Homemade soft pretzels allow you to control the ingredients, ensuring a fresher, healthier alternative to store-bought versions, which often contain preservatives and artificial flavors. With just a few wholesome ingredients, you can whip up a batch that’s perfect for any occasion, satisfying cravings without guilt. In this article, we will explore the history of soft pretzels, delve into their ingredients, and guide you through the initial steps of creating your very own tantalizing soft pretzels.
Understanding Soft Pretzels
Soft pretzels have a rich history that dates back centuries, with origins tracing back to ancient civilizations. The first pretzels are believed to have emerged in 610 AD in Europe, particularly in places like Italy and Germany. They were originally crafted by monks as a reward for children who memorized their prayers, symbolizing arms crossed in prayer. Over time, pretzels evolved into a popular snack throughout Europe, with each region adding its unique twist to the recipe.
The distinction between soft and hard pretzels lies in their texture and preparation. Soft pretzels, as the name suggests, are characterized by their chewy, soft interior and a slightly crisp exterior. They are typically boiled in a baking soda solution before baking, which gives them that signature flavor and texture. In contrast, hard pretzels are baked without boiling, resulting in a crunchy texture that is often enjoyed as a snack. In recent years, soft pretzels have gained immense popularity in various cultures, especially in the United States, where they are commonly sold at street vendors, sports events, and fairs.
The appeal of soft pretzels extends beyond their taste; they are versatile snacks that can be enjoyed plain, sprinkled with coarse sea salt, or served with an array of dips. One of the most beloved pairings is the cheesy dip, which adds a creamy richness that complements the salty pretzel beautifully. This indulgent combination makes soft pretzels a favorite for gatherings, movie nights, and casual get-togethers.
Essential Ingredients for Soft Pretzels
Creating the perfect soft pretzel starts with understanding the essential ingredients that come together to form this delightful snack. Each component plays a crucial role in achieving the right flavor and texture:
1. Warm Water: The foundation of any yeast-based dough, warm water is essential for activating the yeast. The ideal temperature for the water should be between 110°F to 115°F (43°C to 46°C), as this warmth encourages the yeast to bloom, creating the airy structure that soft pretzels are known for.
2. Granulated Sugar: Sugar serves multiple purposes in soft pretzel dough. It not only adds a hint of sweetness but also acts as food for the yeast, promoting fermentation and contributing to the dough’s rise. This sugar boost helps create a beautifully golden crust during baking.
3. Active Dry Yeast: As the leavening agent in this recipe, active dry yeast is responsible for creating the light and fluffy texture of soft pretzels. When activated in warm water, the yeast ferments, producing carbon dioxide which causes the dough to expand.
4. All-Purpose Flour: The backbone of the dough, all-purpose flour provides the necessary structure and chewiness to the pretzels. Using high-quality flour ensures that your pretzels have the right amount of elasticity and strength to hold their shape.
5. Unsalted Butter: Butter adds richness and flavor to the pretzel dough. It enhances the overall taste and contributes to the tender texture of the pretzels. Using unsalted butter allows for better control over the saltiness of the final product.
6. Kosher Salt: Essential for flavor enhancement, kosher salt is sprinkled on top of the pretzels before baking, creating a delightful contrast to the sweetness of the dough. It also plays a role in regulating yeast activity, ensuring that the dough rises properly.
These ingredients are not just random components; they work in harmony to create the unique flavor and texture that make soft pretzels so irresistible. Understanding their roles will help you appreciate the artistry behind this beloved snack and guide you in making the best pretzels possible.
Creating the Perfect Dough
Now that we have a clear understanding of the essential ingredients, let’s dive into the process of creating the perfect dough for our soft pretzels. This step is crucial for achieving that characteristic chewiness and flavor.
Step 1: Activating the Yeast
The first step in making soft pretzel dough is to activate the yeast. In a small mixing bowl, combine the warm water and granulated sugar. Sprinkle the active dry yeast over the top and let it sit for about 5 to 10 minutes. During this time, you’ll see the yeast foam and bubble, indicating that it’s alive and ready to work its magic. This blooming process is vital, as it ensures that the yeast will effectively leaven the dough.
Step 2: Mixing the Dough
Once the yeast has activated, it’s time to mix the dough. In a large mixing bowl, combine the all-purpose flour and kosher salt. Create a well in the center of the flour and pour in the yeast mixture along with the melted unsalted butter. Use a wooden spoon or a spatula to stir the ingredients together until a shaggy dough begins to form.
Step 3: Kneading Techniques
Kneading is an essential technique that develops gluten in the dough, giving it the chewy texture we love in soft pretzels. Transfer the dough onto a lightly floured surface and knead it for about 5 to 7 minutes. To knead, push the dough away from you with the heel of your hand, fold it back over itself, and rotate it a quarter turn. Repeat this process until the dough is smooth and elastic. If the dough is too sticky, you can sprinkle a little more flour as needed, but be cautious not to add too much, as this can result in a dense pretzel.
Step 4: Letting the Dough Rise
After kneading, place the dough in a lightly greased bowl and cover it with a clean kitchen towel or plastic wrap. Allow it to rise in a warm, draft-free environment for about 1 to 1.5 hours, or until it has doubled in size. This rising process is crucial, as it allows the yeast to produce gas, creating air pockets in the dough that result in a light and fluffy pretzel.
To create the perfect environment for rising, consider placing the bowl in a warm oven (turned off) or near a heating element. The warmth will encourage the yeast to thrive, leading to a better rise.
The Science Behind Boiling Pretzels
Once the dough has risen, it’s time to shape the pretzels and prepare for the crucial boiling step. The boiling process is what sets pretzels apart from other baked goods and is key to achieving that signature flavor and texture.
The Boiling Process
Before baking, soft pretzels are traditionally boiled in a solution of water and baking soda. This step is essential for several reasons. First, boiling in baking soda water gives the pretzels their distinct dark brown color and shiny crust. The alkaline nature of the baking soda alters the pH of the dough’s surface, promoting the Maillard reaction during baking, which is responsible for that beautiful golden-brown crust.
Additionally, the boiling process helps set the outer layer of the pretzel, creating a chewy texture while keeping the inside soft and fluffy. The longer the pretzels boil, the chewier they will become, so you can adjust the boiling time to suit your personal preference.
Role of Baking Soda
Baking soda plays a crucial role in this boiling process. It not only contributes to the pretzel’s color and flavor but also affects the texture. The alkaline environment created by the baking soda enhances gluten development, leading to a satisfying chew. Additionally, it helps to prevent the pretzels from becoming too doughy or soft.
By understanding the science behind boiling pretzels, you can see how each step contributes to the overall success of your homemade soft pretzels. The combination of activating yeast, kneading dough, allowing it to rise, and boiling in a baking soda solution creates a final product that is truly tantalizing. As we move forward, we’ll explore the final steps of shaping, baking, and enjoying these pretzels with cheesy bliss. Stay tuned for the next part of this delicious journey!
How Boiling Affects the Texture and Color of Pretzels
Boiling is a crucial step in the pretzel-making process that directly influences the final product’s texture and color. When pretzels are boiled in a baking soda solution before baking, they undergo a chemical reaction that creates a unique crust. This process is essential for developing the pretzel’s signature chewy exterior. The alkaline nature of baking soda helps to gelatinize the dough’s surface, allowing it to retain moisture while baking, resulting in a soft interior contrasted by a firm outer layer.
Furthermore, boiling also plays a pivotal role in achieving the iconic deep brown color of pretzels. The Maillard reaction, a chemical reaction between amino acids and reducing sugars, is intensified at the high temperatures of boiling. As the boiled pretzels bake, this reaction contributes to their golden-brown crust, enhancing both their visual appeal and flavor. Therefore, never skip the boiling step when crafting your tantalizing soft pretzels; it’s the secret to achieving that perfect pretzel texture and color.
Shaping Your Pretzels
Once your dough has risen, it’s time to shape your pretzels into that classic twisted form. Here are detailed instructions on how to achieve this:
1. Divide the Dough: Start by dividing the rested dough into equal portions. Aim for pieces weighing around 3-4 ounces each; this size will yield pretzels that are not too large or too small.
2. Roll into Strips: Take each piece of dough and roll it into a long, thin rope. To do this, use your palms to gently roll the dough against a clean surface, gradually elongating it to about 20-24 inches long. Make sure to keep the thickness uniform to ensure even baking.
3. Form the Pretzel Shape: To create the pretzel shape, take the rolled dough and form a U shape. Cross the ends of the U over each other to create a twist, then fold the twisted ends down toward the bottom of the U. Press the ends firmly onto the pretzel base to secure the shape.
4. Visualizing the Twisting Technique: If you’re unsure about the twisting technique, consider watching a video demonstration or looking at images online. Visual aids can be incredibly helpful in mastering this technique.
5. Achieving Uniform Sizes: To ensure even baking, focus on making each pretzel the same size. Use a kitchen scale for precision if desired, or simply eyeball it while keeping an eye on consistency. Uniform pretzels will bake more evenly and look better when served.
Baking the Pretzels to Perfection
Before baking, ensure your oven is preheated to a robust 450°F (232°C). Preheating is essential as it ensures the pretzels start baking immediately, creating a crispy crust while keeping the inside soft.
1. Boiling: As you boil the pretzels, do so in a large pot of water mixed with baking soda. Boil each pretzel for about 30 seconds on each side. This will enhance their texture and contribute to the beautiful color.
2. Recognizing Perfectly Baked Pretzels: After boiling, place your pretzels on a baking sheet lined with parchment paper. Bake for around 12-15 minutes, or until they achieve a deep golden-brown hue. The pretzels should look shiny and have a firm exterior. The aroma that fills your kitchen during this time will be irresistible, signaling that they are almost ready.
3. Variations in Baking Time and Temperature: Keep in mind that oven performance can vary. If your oven tends to run hot or cool, you may need to adjust the baking time slightly. Always check your pretzels a few minutes before the suggested time to prevent overbaking.
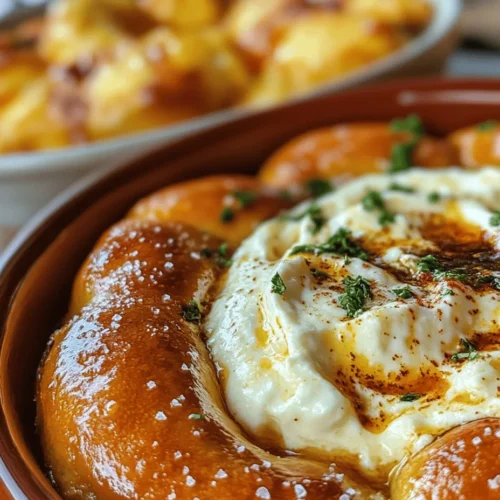
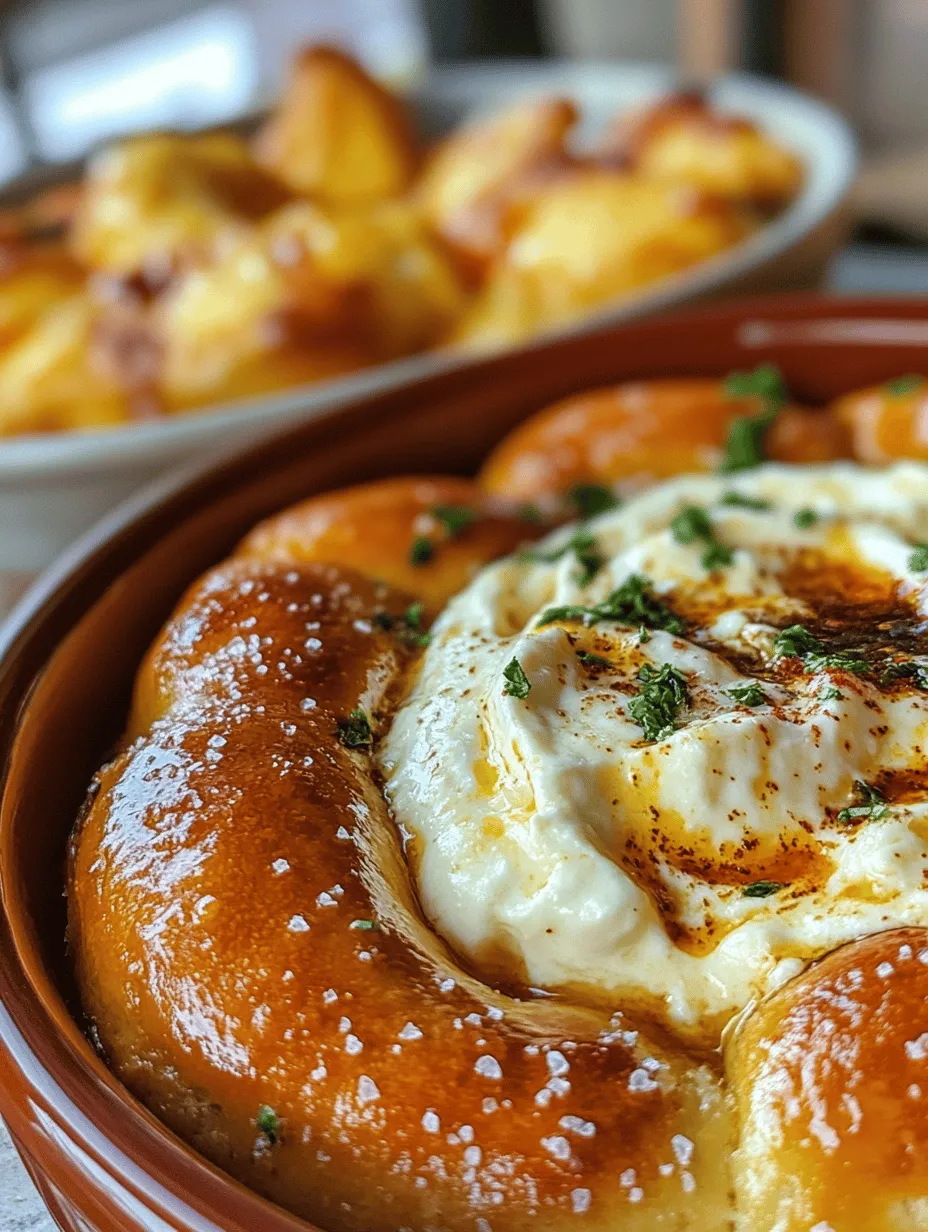
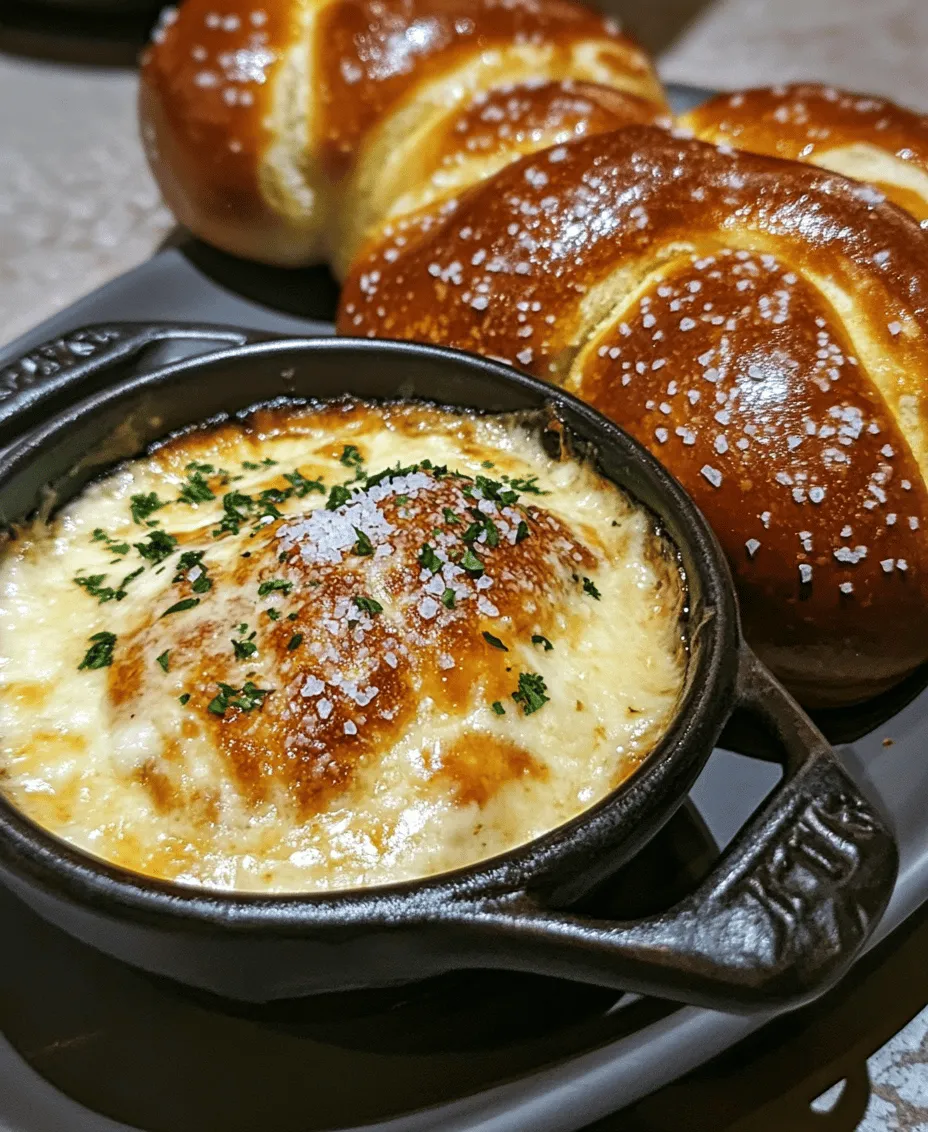
Crafting the Cheesy Bliss Dip
A soft pretzel is incomplete without its companion, the cheesy bliss dip. This dip adds a creamy, savory element that perfectly complements the chewy texture of the pretzels. Here’s how to create it:
Ingredients Breakdown for the Cheese Dip
– 1 cup shredded sharp cheddar cheese: For a punchy flavor.
– 1 cup shredded mozzarella cheese: For creaminess and stretch.
– 1 cup milk: Whole or 2% works best for creaminess.
– 2 tablespoons butter: Adds richness.
– 2 tablespoons all-purpose flour: For thickening.
– 1 teaspoon garlic powder: For added flavor.
– Salt and pepper to taste: To enhance the overall taste.
Step-by-Step Instructions to Create a Smooth, Creamy Dip
1. Prepare the Roux: In a medium saucepan over medium heat, melt the butter. Once melted, whisk in the flour and cook for about 1 minute until it forms a smooth paste.
2. Add Milk: Gradually whisk in the milk, ensuring there are no lumps. Continue to stir frequently until the mixture thickens and bubbles.
3. Incorporate Cheese: Lower the heat and add the shredded cheddar and mozzarella cheese, stirring constantly until melted and combined into a creamy dip.
4. Season: Add garlic powder, salt, and pepper to taste. Mix well and remove from heat.
5. Customizing the Dip: For added flavor variations, consider mixing in diced jalapeños for heat, or a splash of hot sauce for a tangy kick. You can also experiment with different types of cheese, such as pepper jack or gouda, to create your preferred flavor profile.
Serving Your Tantalizing Pretzels
The best way to enjoy your soft pretzels is while they are still warm. Here are some best practices for serving them alongside your cheesy dip:
1. Serving Warm Pretzels: Once you pull the pretzels from the oven, let them cool for just a couple of minutes. Serve them warm with the cheesy dip in a small bowl for easy access.
2. Creative Presentation Ideas: For gatherings and parties, consider arranging the pretzels in a basket lined with a colorful cloth. Serve the cheese dip in a small fondue pot or a decorative bowl in the center. You can also sprinkle some fresh herbs or a dash of paprika on top of the dip for a pop of color.
3. Exploring Pairing Options with Beverages: Soft pretzels pair wonderfully with a variety of beverages. Consider serving them with craft beers, a selection of wines, or even homemade lemonade. For a family-friendly option, serve with sparkling apple juice or flavored sodas.
Nutritional Benefits of Homemade Soft Pretzels
Homemade soft pretzels not only taste better than store-bought versions, but they also come with several nutritional benefits:
– Healthier Ingredients: When you make pretzels at home, you have control over the ingredients. You can opt for whole wheat flour instead of all-purpose flour for added fiber and nutrients. This can help improve digestion and provide more sustained energy.
– Nutritional Insights: The basic ingredients in this recipe—flour, water, yeast, and salt—are relatively simple and free of preservatives and additives found in many store-bought snacks. The cheese dip offers calcium and protein from the cheese, making it a satisfying accompaniment.
– Making the Recipe Healthier: For those looking to reduce calories or fat, consider using low-fat cheese or Greek yogurt instead of butter in the cheese dip. You can also experiment with adding pureed vegetables, like roasted bell peppers or spinach, into the cheese dip for added nutrients without sacrificing flavor.
Conclusion
Creating homemade soft pretzels paired with a cheesy bliss dip is not only a rewarding culinary experience but also a delightful way to share a tasty snack with friends and family. The process allows you to customize flavors and textures to your liking, making each batch unique.
This recipe is perfect for parties, movie nights, or simply enjoying as a warm snack at home. Whether you choose to keep them classic or add some personal flair with different cheeses and seasonings, soft pretzels and cheese dip are sure to be crowd-pleasers.
We encourage you to try making these tantalizing soft pretzels for yourself. Experience the joy of kneading, shaping, and baking, then indulge in the deliciousness of warm pretzels dipped in creamy cheese. The versatility of this snack makes it a staple for various occasions, from casual get-togethers to festive celebrations. So gather your ingredients, roll up your sleeves, and prepare to enjoy a delightful culinary adventure!