
Introduction
Sugar cut-out cookies are a timeless treat that has enchanted bakers and sweet enthusiasts for generations. Their charm lies not only in their delicate sweetness but also in their versatility for any occasion, from festive holiday celebrations to casual family gatherings. The act of rolling out dough and using cookie cutters to create whimsical shapes allows for creativity and personalization, making these cookies a favorite among people of all ages.
What truly makes these cut-out cookies magical is the joy they bring when they are shared with loved ones. Whether adorned with colorful icing or left simple yet elegant, these cookies can transform any gathering into a celebration. As you embark on your baking journey with our Magical Sugar Cut-Out Cookies recipe, you’ll discover the importance of a reliable cut-out cookie recipe that guarantees delightful results every time.
The Allure of Sugar Cut-Out Cookies
The history of sugar cookies dates back to the 1700s, with origins in several cultures around the world. The earliest known sugar cookie recipe was created by the Dutch settlers in the New World, who used simple ingredients readily available to them. Over the years, sugar cookies have evolved, becoming a staple in various culinary traditions. In the United States, they’ve become particularly beloved for their role in holiday festivities, especially during Christmas and Halloween, where they are often cut into festive shapes like stars, trees, and pumpkins.
Cut-out cookies hold a special place in holiday traditions, as they are often baked as gifts or shared during gatherings. Decorating them becomes a cherished activity for families, allowing everyone to unleash their creativity through colorful icing, sprinkles, and edible embellishments. The personalization found in sugar cut-out cookies makes them a canvas for self-expression, reflecting the personality and creativity of the baker.
Moreover, the allure of sugar cut-out cookies extends beyond just their taste and appearance; they evoke feelings of nostalgia and warmth. Baking these cookies can bring back memories of childhood, family traditions, and the joy of sharing sweet treats with friends and family. With this recipe, you’ll be able to create your own magical moments and lasting memories.
Ingredients Overview
Understanding the role of each ingredient is crucial for achieving the perfect sugar cut-out cookies. Here’s a detailed look at the essential components of this delightful recipe:
All-Purpose Flour
All-purpose flour serves as the backbone of these cookies, providing the necessary structure and texture. The gluten content in all-purpose flour allows the cookies to hold their shape when cut out, while still remaining tender when baked. It’s essential to measure your flour accurately to avoid dense or overly crumbly cookies.
Baking Powder
Baking powder is a leavening agent that plays a pivotal role in creating the right texture for your cookies. It helps them rise slightly during baking, resulting in a light and airy cookie. Using the correct amount of baking powder ensures that your cookies won’t be too flat or too thick.
Salt
Salt is a vital ingredient that enhances the overall flavor profile of your cookies. It balances the sweetness of the sugar, making each bite more enjoyable. A pinch of salt can elevate your cookies from ordinary to extraordinary, ensuring that the flavors are well-rounded.
Unsalted Butter
The use of unsalted butter is essential for achieving the creamy and rich flavor that sugar cookies are known for. Butter adds moisture to the dough, contributing to a tender texture. It’s best to use butter that is at room temperature for easy creaming with sugar, leading to a light and fluffy dough.
Granulated Sugar
Granulated sugar is the star of the show, providing sweetness and contributing to the overall texture of the cookies. The sugar also aids in the creaming process with butter, helping to incorporate air into the dough, which results in a tender cookie.
Egg
Eggs are crucial for binding the ingredients together and adding moisture to the dough. They also contribute to the overall structure of the cookie, ensuring that it holds its shape during baking. The egg acts as a binding agent, ensuring that your cookies don’t crumble apart.
Vanilla and Almond Extracts
These extracts are key to enhancing the flavor of your sugar cookies. Vanilla provides a warm, sweet aroma, while almond extract adds a subtle nuttiness that complements the overall flavor. Using both extracts will give your cookies a delightful depth of flavor that is sure to impress.
Royal Icing and Food Coloring
For those looking to add a decorative flair to their cut-out cookies, royal icing is the perfect choice. It dries hard, allowing for intricate designs and patterns. Food coloring can be added to the royal icing, making it easy to create vibrant, eye-catching decorations that make your cookies stand out.
Step-by-Step Instructions for Perfect Cookies
Now that you have a solid understanding of the ingredients, it’s time to dive into the step-by-step process for preparing your Magical Sugar Cut-Out Cookies. Following these instructions will ensure you achieve the best possible results.
Preparing the Dough
The first step in making your sugar cut-out cookies is preparing the dough. Accurate measurements are crucial at this stage, as they will determine the texture and consistency of your cookies. Start by gathering all your ingredients and ensuring that your butter is softened to room temperature for optimal creaming.
1. Whisk the Dry Ingredients: In a medium bowl, whisk together the all-purpose flour, baking powder, and salt. This step is essential as it allows the baking powder to be evenly distributed throughout the flour, ensuring uniform leavening during baking. Whisking also aerates the flour, which contributes to a lighter texture in the final cookies.
2. Cream the Butter and Sugar: In a large mixing bowl, beat together the softened unsalted butter and granulated sugar using a hand mixer or stand mixer. Creaming is crucial, as it incorporates air into the mixture, resulting in a light and fluffy dough. Beat the mixture on medium speed for about 2-3 minutes until it becomes pale and fluffy. This step is vital for achieving the right texture in your cookies.
Incorporating Egg and Extracts
Once the butter and sugar are well combined, it’s time to incorporate the egg and extracts.
3. Add the Egg and Extracts: With the mixer on low speed, add the egg and both the vanilla and almond extracts to the creamed butter and sugar mixture. Mix until just combined, ensuring that the egg is fully incorporated into the dough. This emulsification process helps create a uniform dough, preventing any separation of ingredients.
Combining Ingredients
The final step in preparing your dough involves combining the dry ingredients with the wet mixture.
4. Gentle Mixing: Gradually add the flour mixture to the wet ingredients, mixing on low speed until just combined. It’s important to avoid overmixing at this stage, as doing so can develop the gluten in the flour and lead to tough cookies. Mix until you see no dry flour, and the dough comes together.
5. Chill the Dough: Once your dough is well combined, divide it into two equal portions, shape each into a disk, and wrap them in plastic wrap. Refrigerate the dough for at least 1-2 hours, or overnight if possible. Chilling the dough is crucial as it allows the butter to firm up, making it easier to roll out and cut shapes without sticking.
By following these initial steps, you are well on your way to creating delightful Magical Sugar Cut-Out Cookies that will bring joy to any occasion. Stay tuned for the next part where we’ll delve into the baking and decorating process, ensuring your cookies are as beautiful as they are delicious.

Chilling the Dough
Chilling the dough is a crucial step in the process of making magical sugar cut-out cookies. It not only helps to develop the flavors but also makes the dough easier to handle when it comes to rolling and cutting. When you chill the dough, the fats (like butter) solidify, which reduces the spread of the cookies during baking. This results in beautifully shaped cookies that hold their form.
For best results, it’s recommended to chill the dough for at least 1 hour. However, if you have time, chilling it for longer, even up to 24 hours, can enhance the flavors significantly. The longer the dough rests in the refrigerator, the more pronounced the buttery flavor becomes, resulting in a richer cookie.
Prepping for Baking
Before you start rolling out your chilled dough, it’s essential to preheat your oven to 350°F (175°C). Preheating ensures that the cookies bake evenly and helps achieve that perfect golden edge. While the oven is heating, take this opportunity to prepare your baking sheets. Line them with parchment paper to prevent the cookies from sticking. This step not only makes cleanup easier but also ensures that your cookies slide off the baking sheet without breaking.
Rolling and Cutting the Dough
Now comes the fun part—rolling and cutting the dough! Start by lightly dusting your clean work surface with flour to prevent sticking. Take your chilled dough out of the refrigerator and let it sit at room temperature for about 5-10 minutes; this will make it more pliable.
Using a rolling pin, roll the dough out to a thickness of about 1/4 inch. It’s essential to keep the thickness uniform to ensure even baking. If you notice your dough is sticking, add a little more flour to your work surface and rolling pin.
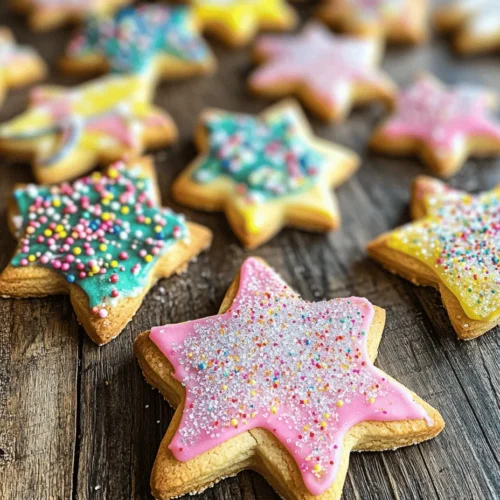
When it comes to using cookie cutters, the possibilities are endless! You can create various shapes—stars, hearts, Christmas trees, or even seasonal motifs for different occasions. For added fun, consider using a cookie cutter set that includes different sizes, allowing you to layer cookies for a more visually appealing presentation.
Baking the Cookies
Once you have cut out your cookies and arranged them on the lined baking sheets, it’s time to bake! Place the sheets in the preheated oven and set a timer for about 8-10 minutes. Keep a close eye on them as they bake; the cookies are done when the edges turn a light golden brown.
To avoid overbaking, it’s better to err on the side of caution. As soon as you see the edges change color, remove them from the oven and allow them to cool on the baking sheet for a few minutes before transferring them to a wire rack. This cooling time allows the cookies to firm up a bit, making them easier to handle without breaking.
Cooling and Decorating
Proper cooling is vital before decorating your cookies. Once you’ve transferred them to a wire rack, allow them to cool completely. This ensures that any icing or decorations you apply won’t melt.
When it comes to decorating, royal icing is a popular choice. This type of icing dries hard, making it perfect for intricate designs. You can achieve various effects by adjusting the consistency of the royal icing—thinner for flooding and thicker for outlining.
To add some flair, consider incorporating food coloring into your icing for vibrant designs. Sprinkles, edible glitter, or colored sugar can also elevate your cookies and make them visually appealing. Don’t hesitate to let your creativity shine; try using different colors and patterns to make each cookie unique.
Common Challenges and Troubleshooting
Baking can sometimes present challenges, but with a little know-how, you can overcome them. One common issue is dough consistency. If your dough seems too dry, it may need a little more moisture. A teaspoon of milk can help bring it together. Conversely, if it’s too sticky, a little additional flour can help.
Another challenge may arise during baking. If you notice your cookies spreading too much, it could be due to warm dough. Always ensure your dough is chilled before rolling it out. Additionally, using parchment paper can help minimize spreading on the baking sheet.
If your cookies are unevenly baked, it could be that your oven temperature is inaccurate. Consider investing in an oven thermometer to ensure you’re baking at the correct temperature. Baking sheets can also impact the outcome—if you have multiple sheets in the oven, rotate them halfway through baking to ensure even cooking.
Variations and Flavor Enhancements
While the classic sugar cookie is delicious, there are plenty of variations you can experiment with. For a citrusy twist, consider adding lemon or orange zest to the dough. Spices like cinnamon or nutmeg can also add depth and warmth to the flavor profile.
If you’d like to explore alternative decorations beyond royal icing, consider using buttercream frosting or even chocolate ganache for a different texture and taste. For those following a gluten-free or vegan diet, substitutes such as almond flour or coconut oil can be used in place of traditional ingredients, allowing everyone to enjoy these delightful cookies.
The Joy of Sharing and Making Memories
Baking cut-out cookies is not just about the end product; it’s about the memories created in the kitchen. Many families have traditions centered around baking cookies during holidays or special occasions. It’s an opportunity to gather with loved ones, share stories, and pass down recipes from generation to generation.
Encourage your family or friends to join in the fun! Experimenting with designs and flavors can be a bonding activity that creates lasting memories. The joy of sharing your creations with others, whether at a gathering or simply at home, adds to the delight of baking.
Conclusion
Magical sugar cut-out cookies are a delightful treat that brings joy not only through their taste but also through the process of baking and decorating. With their versatility, you can adapt them for any occasion, ensuring that they remain a staple in your baking repertoire.
As you embark on your baking journey, embrace the process, allow your creativity to flourish, and don’t hesitate to share your creations with loved ones. Remember, each cookie tells a story, and the joy that comes from baking is a beautiful form of creative expression. So gather your ingredients, roll up your sleeves, and enjoy the magical experience of baking sugar cut-out cookies!