Introduction
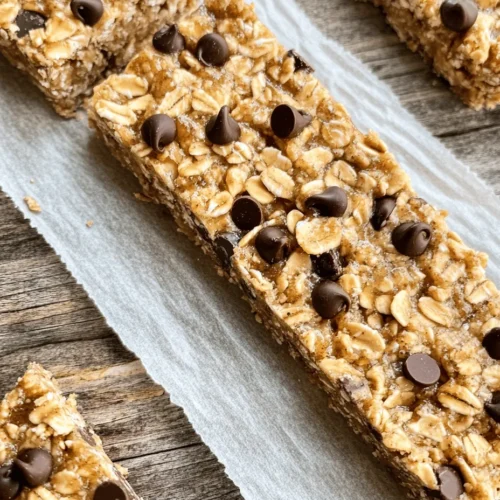
In our fast-paced world, where convenience often trumps nutrition, finding quick and healthier snack options can be a daunting task. Enter the Easiest Microwave Chewy Peanut Butter Granola Bars—an effortless recipe that beautifully marries wholesome ingredients with the simplicity of microwave cooking. These bars are perfect for anyone on the go, whether you’re rushing out the door for work, need a nutritious snack for your kids, or simply want a mid-afternoon pick-me-up to fuel your energy levels.
Not only are these granola bars deliciously chewy and satisfying, but they are also incredibly versatile. You can easily customize them to suit your personal taste or dietary preferences. Want them to be nut-free? Swap out the peanut butter for sunflower seed butter. Prefer a touch of chocolate? Toss in some chocolate chips or cocoa powder. The options are endless!
This article will take you through every step of the process—starting from selecting your ingredients to storing your finished bars. By the end, you’ll have the knowledge and confidence to create the perfect snack that can be enjoyed anytime.
Understanding the Ingredients
Exploring the Key Components of Granola Bars
To create the perfect chewy granola bar, understanding your ingredients is crucial. Each component plays a significant role in flavor, texture, and nutritional value. Let’s break down the key ingredients that contribute to the success of your Easiest Microwave Chewy Peanut Butter Granola Bars.
Rolled Oats: The Base of Your Bars
Rolled oats serve as the foundation of your granola bars. They provide essential fiber, which can help with digestion and keep you feeling full longer. When selecting oats, opt for old-fashioned rolled oats rather than instant oats. Old-fashioned rolled oats have a heartier texture and hold up better during the cooking process, resulting in a chewier bar. They also absorb moisture effectively, making them perfect for binding the other ingredients together.
Peanut Butter: Creamy vs. Crunchy
Peanut butter is the star of this recipe, lending rich flavor and healthy fats. You can choose between creamy or crunchy peanut butter depending on your preference. Creamy peanut butter will yield a smooth, uniform texture, while crunchy peanut butter adds delightful little bursts of peanut goodness throughout the bars. Just be sure to select a natural peanut butter that contains minimal ingredients—ideally just peanuts and salt—to keep your snack wholesome.
Sweeteners: Honey vs. Maple Syrup
Sweeteners are essential for not only flavor but also binding the ingredients together. This recipe typically uses honey, which lends a delightful sweetness and helps the bars hold their shape. However, if you’re looking for a vegan alternative, maple syrup works beautifully as a substitute. Both options provide moisture and enhance the flavor profile of the granola bars, so consider which one aligns best with your dietary needs and taste preferences.
Brown Sugar: Enhancing Flavor and Texture
Adding a touch of brown sugar to your granola bars elevates the overall flavor and contributes to the chewy texture. Brown sugar contains molasses, which imparts a slight caramel-like taste that complements the nuttiness of the peanut butter. While it’s optional, including brown sugar can enhance the depth of flavor and make your bars even more irresistible.
Optional Add-ins: Chocolate Chips and Beyond
Once you’ve nailed down the base ingredients, the fun begins with optional add-ins. You can customize your granola bars with an array of ingredients to suit your taste. Popular choices include chocolate chips, dried fruits (like cranberries or raisins), nuts, or seeds. Feel free to experiment and create your own signature blend, but remember to keep the overall balance of wet and dry ingredients in mind to maintain the desired texture.
The Role of Vanilla Extract and Salt
Finally, a splash of vanilla extract can enhance the overall flavor of your granola bars, adding a warm, aromatic touch. Additionally, a pinch of salt is essential to elevate the flavors and balance the sweetness. Both of these ingredients are small but impactful, ensuring a well-rounded taste in every bite.
Preparation Steps for Easiest Microwave Chewy Peanut Butter Granola Bars
Setting the Stage: Preparing Your Microwave Dish
Before diving into the actual cooking process, it’s essential to prepare your microwave dish properly. This step ensures that your granola bars come out easily and maintain their shape.
The Importance of Parchment Paper
Using parchment paper to line your dish is one of the simplest yet most effective ways to prevent sticking. Start by cutting a piece of parchment paper that is large enough to extend over the edges of your dish. This will allow you to easily lift the finished bars out once they have cooled. Additionally, lining your dish with parchment paper helps with cleanup, making the entire process more enjoyable.
Choosing the Right Dish Size
Choosing the right dish size is critical for achieving the perfect thickness in your granola bars. A square or rectangular microwave-safe dish works best; ideally, it should be around 8×8 inches or 9×9 inches. If your dish is too large, your bars will be thinner and may crumble easily. Conversely, a dish that is too small may cause the bars to cook unevenly. Aim for a dish that will allow the mixture to spread evenly while still being thick enough to hold together.
Mixing the Wet Ingredients: Creating a Smooth Base
With your dish prepared, it’s time to move on to mixing the wet ingredients. This is where the magic begins, as these components will come together to form a smooth, cohesive mixture.
Step-by-Step Instructions for Combining Peanut Butter, Honey, and Brown Sugar
1. Measure Ingredients: Begin by measuring out your peanut butter, honey, and brown sugar. For this recipe, you’ll typically need about 1 cup of peanut butter, ½ cup of honey, and ¼ cup of brown sugar. Adjust the quantities based on your taste preferences.
2. Combine Ingredients: In a microwave-safe bowl, add the peanut butter, honey, and brown sugar.
3. Microwave for Short Intervals: Microwave the mixture on high for about 30 seconds. Remove the bowl and stir the mixture well. This process helps to soften the peanut butter and melt the brown sugar, making it easier to combine. Repeat this process in 15-second intervals until the mixture is smooth and well-combined. Be cautious not to overheat, as this can cause the mixture to become too hot and difficult to handle.
4. Add Vanilla Extract and Salt: Once your base is smooth, stir in a teaspoon of vanilla extract and a pinch of salt. This step is crucial for enhancing the flavor profile of your granola bars.
Incorporating the Dry Ingredients: Perfectly Blending Oats and Flavor
With your wet mixture ready, it’s time to incorporate the dry ingredients. This step requires careful techniques to ensure even distribution.
Techniques for Even Distribution
1. Add Rolled Oats: Gradually pour in 2 cups of rolled oats to the wet mixture. Using a spatula or wooden spoon, gently fold the oats into the mixture. This method prevents the oats from clumping together and ensures that every bite is filled with flavor.
2. Mix Thoroughly: Continue to mix until all the oats are evenly coated with the wet ingredients. If you’re adding any optional ingredients, like chocolate chips or nuts, now is the time to fold them in as well. Aim for a uniform distribution to guarantee that each bar has a balanced flavor.
Transferring the Mixture: Ensuring Firmness and Evenness
Once your mixture is well-combined, it’s time to transfer it to the prepared dish. This step is vital for achieving the right texture and firmness in your finished granola bars.
Pressing Techniques for Optimal Texture
1. Transfer the Mixture: Pour the granola mixture into the prepared dish.
2. Use Damp Hands or a Spatula: To ensure that the mixture presses down evenly, you can either use damp hands or a spatula. If using your hands, lightly wet them to prevent sticking and press the mixture firmly into the dish. The goal is to create an even layer that adheres well, as this will help the bars hold their shape once cooled.
3. Level the Surface: Use the spatula to smooth out the top, ensuring an even surface. This step is important for both aesthetics and texture, as it ensures that the bars cook evenly without any air pockets.
Cooking Process: Microwaving to Perfection
Now that your mixture is ready, it’s time to microwave it to perfection. This quick cooking method is what makes this recipe so appealing.
Timing Guidelines: How to Avoid Overcooking
1. Microwave Time: Place the dish in the microwave and cook on high for about 2 to 3 minutes. The exact time will depend on your microwave’s wattage and the thickness of the mixture. Start with 2 minutes and check for doneness.
2. Recognizing the Right Texture: The granola bars are done when the edges start to look slightly golden and the center feels firm but not too hard. Remember, the bars will continue to firm up as they cool, so it’s better to err on the side of undercooking slightly.
Cooling and Setting: The Crucial Final Steps
After microwaving, the final step is to allow your granola bars to cool and set properly.
Why Cooling is Important for Texture
1. Let Them Cool: Once you remove the dish from the microwave, let it cool at room temperature for about 15-20 minutes. This step is essential for allowing the bars to firm up and become easier to cut.
2. Cutting the Bars: Once cooled, use the parchment paper to lift the bars out of the dish. Place them on a cutting board and slice them into your desired size—whether that’s larger bars, bite-sized pieces, or squares.
By following these steps, you’ll be well on your way to creating your very own Easiest Microwave Chewy Peanut Butter Granola Bars. With the right ingredients and a little bit of time, you can enjoy a delicious, homemade snack that fits right into your busy lifestyle. Keep reading to discover more tips and tricks to make these bars even better!
How Parchment Paper Assists in Bar Removal
One of the simplest yet most effective tricks for ensuring the smooth removal of your granola bars from the dish is to use parchment paper. Lining your microwave-safe dish with parchment paper not only prevents the bars from sticking but also makes the cleanup process effortless.
When you pour the sticky granola mix into the dish, the parchment paper creates a barrier between the mixture and the dish. After microwaving, simply lift the edges of the parchment paper, and your granola bars will slide out without a hassle. This technique preserves the integrity of the bars and ensures you can cut them neatly.
Slicing and Storing Your Granola Bars
Cutting Techniques for Neat, Even Bars
Once your granola bars have cooled completely, it’s time to slice them into manageable portions. For the best results, use a sharp knife, which will help in achieving clean cuts without crumbling the bars.
Tips for Using a Sharp Knife
1. Warm the Knife: Run the knife under hot water for a few seconds and then dry it off. The warmth will help cut through the sticky mixture more smoothly.
2. Use a Gentle Sawing Motion: Instead of pressing down hard, use a gentle sawing motion to glide through the bars. This minimizes crumbling and helps maintain their shape.
3. Cutting Board: Place your granola slab on a cutting board to provide a stable surface. If you prefer, you can also cut them in the dish if it’s microwave-safe and sturdy enough.
Different Shapes: Squares vs. Rectangles
Granola bars can be cut into various shapes depending on your preference. Squares are classic and easy to portion, while rectangles can provide a more traditional granola bar look.
– Squares: Cut into 2-inch squares for bite-sized snacks that are ideal for lunchboxes or quick grab-and-go options.
– Rectangles: For a more elongated bar shape, aim for 1-inch by 3-inch rectangles. This shape is often more appealing for those looking for a traditional granola bar experience.
Storage Solutions: Maximizing Freshness
Proper storage of your granola bars is crucial in ensuring they remain fresh and delicious. Here are some effective storage tips:
Airtight Containers: Types and Recommendations
Using airtight containers is essential for keeping your granola bars fresh. Here are some recommended options:
1. Glass Containers: These are excellent for long-term storage and do not retain odors.
2. Plastic Containers: Lightweight and easy to handle, look for BPA-free options for safety.
3. Ziplock Bags: If you’re short on space, ziplock bags can work well. Ensure to remove as much air as possible before sealing.
Room Temperature vs. Refrigeration: What’s Best?
– Room Temperature: If you plan to consume your granola bars within a week, storing them at room temperature in an airtight container is perfectly fine. Keep them in a cool, dry place away from direct sunlight.
– Refrigeration: For longer-lasting freshness, keep your granola bars in the refrigerator. This can extend their shelf life up to two weeks. Just be aware that refrigeration may change the texture slightly, making them a bit firmer.
Nutritional Benefits of Peanut Butter Granola Bars
Now that you know how to cut and store your granola bars, let’s delve into the nutritional benefits of the ingredients, particularly focusing on peanut butter and oats.
The Power of Oats: Health Benefits of Rolled Oats
Rolled oats are a powerhouse ingredient in any granola bar. Their health benefits include:
– Fiber Content and Digestive Health: Oats are rich in both soluble and insoluble fiber, promoting healthy digestion and helping to prevent constipation. Fiber is also known for its ability to keep you feeling full longer.
– Sustained Energy Release: The complex carbohydrates in oats provide a slow release of energy, making them an excellent choice for a pre-workout snack or a mid-afternoon pick-me-up.
Peanut Butter’s Nutritional Profile
Peanut butter is another star ingredient in our granola bars. Here’s what makes it a nutritional powerhouse:
– Protein and Healthy Fats: Peanut butter is packed with protein, which is vital for muscle repair and growth. It also contains healthy fats that support heart health and keep you satiated.
– Essential Vitamins and Minerals: Peanut butter provides important nutrients, including vitamin E, magnesium, and potassium, which contribute to overall health and well-being.
Sweeteners: Balancing Taste and Health
The choice of sweeteners can significantly impact both the flavor and nutritional profile of your granola bars.
– Natural vs. Refined Sugars: Opt for natural sweeteners like honey or maple syrup, which provide additional vitamins and minerals compared to refined sugars. These natural options can also enhance the overall flavor.
– Impact on Blood Sugar Levels: Natural sweeteners typically have a lower glycemic index, meaning they cause a slower rise in blood sugar levels, making them a healthier choice for sustained energy.
Customization Ideas for Your Granola Bars
One of the best aspects of making homemade granola bars is the ability to customize them according to your tastes and dietary needs. Here are some ideas to get you started:
Exploring Flavor Variations
– Nut and Seed Additions: Enhance the crunch and flavor of your bars by incorporating nuts like almonds, walnuts, or seeds such as chia or flaxseed. These add healthy fats and extra protein.
– Dried Fruits for Natural Sweetness: Raisins, cranberries, or apricots can add natural sweetness and chewiness to your bars. They also provide additional vitamins and minerals.
– Spices and Flavor Enhancements: Experiment with spices like cinnamon, nutmeg, or vanilla extract to enrich the flavor profile of your granola bars. A pinch of salt can also elevate the taste by balancing sweetness.
Adjusting for Dietary Needs
– Gluten-Free Options: For those with gluten sensitivities, ensure you use certified gluten-free oats. You can also explore gluten-free flours for binding if necessary.
– Vegan Substitutions: If you’re following a vegan diet, substitute traditional honey with maple syrup or agave nectar. You can also use nut butters that are vegan-friendly.
Conclusion
The Easiest Microwave Chewy Peanut Butter Granola Bars embody convenience without sacrificing health or flavor. With simple ingredients and a quick preparation process, these bars are perfect for anyone looking to maintain a balanced diet while enjoying a tasty snack. The flexibility in customization allows for endless variations, ensuring that your granola bars can always cater to your individual preferences and dietary requirements.
Embrace this recipe as a staple in your kitchen, and enjoy the delightful satisfaction of homemade snacks that nourish both body and soul. Whether you enjoy them as a quick breakfast, a midday snack, or a post-workout treat, these granola bars provide a perfect blend of taste, nutrition, and convenience. So gather your ingredients, get creative with your mix-ins, and savor the satisfaction of your homemade granola bars!