Introduction
Blooming onions have become a beloved staple in the world of appetizers, often gracing the menus of popular restaurants and serving as a crowd-pleaser at parties. Their unique appearance and delightful crunch make them an irresistible choice for many. Traditionally deep-fried, these flavorful bulbs can now be enjoyed in a healthier way, thanks to the air fryer. This method not only reduces the amount of oil used but also enhances the crispy texture that everyone craves.
In this article, we will guide you through the process of making crispy mini blooming onions in your air fryer. You’ll discover how easy it is to replicate this restaurant favorite in the comfort of your own kitchen, ensuring that every bite is packed with flavor and crunch. From the essential ingredients to the step-by-step preparation process, we aim to equip you with everything you need to create a delicious appetizer that is sure to impress your family and friends.
Understanding Blooming Onions
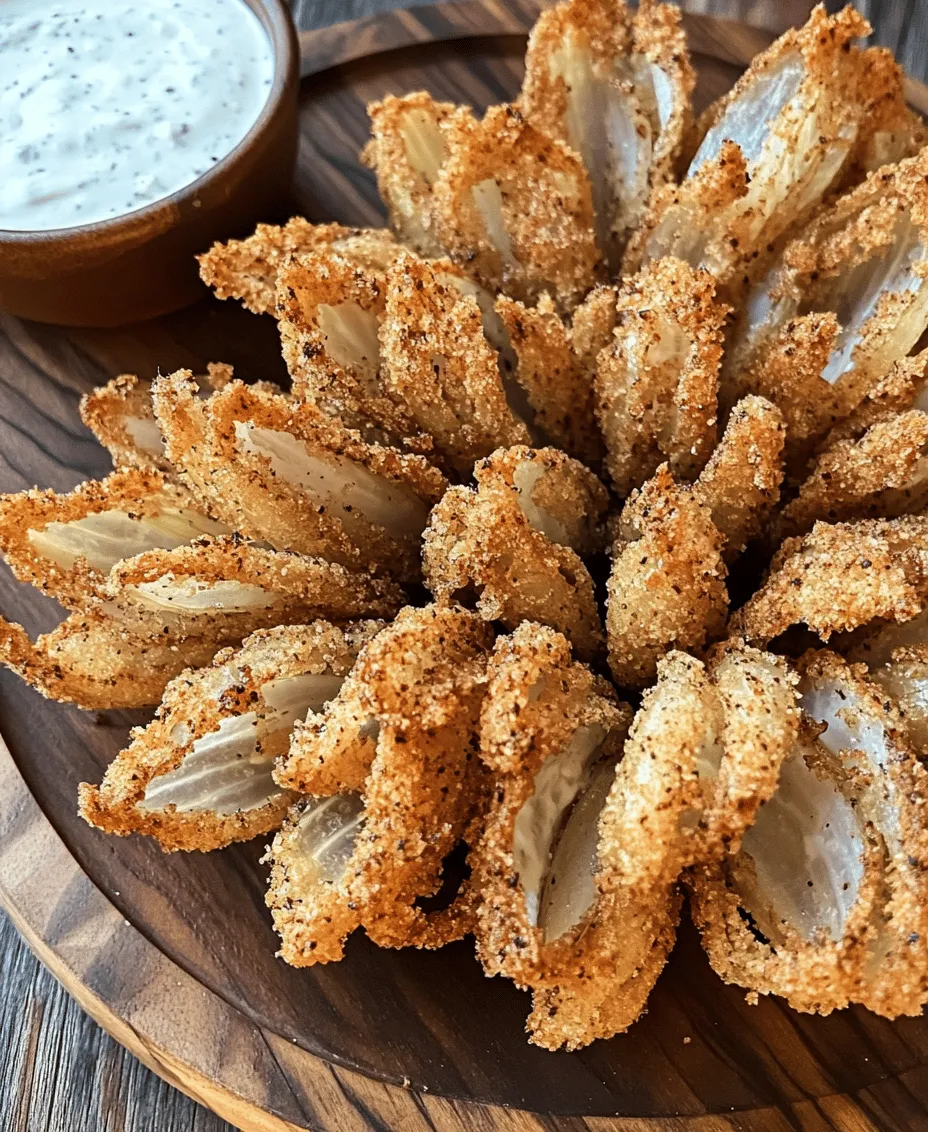
So, what exactly are blooming onions? At their core, these delicious appetizers consist of an onion that has been sliced and opened up to resemble a blooming flower. Originating in the United States, the blooming onion gained immense popularity thanks to its introduction at the Outback Steakhouse in the 1980s. The dish quickly became synonymous with casual dining, often served with a tangy dipping sauce that complements the rich, savory flavor of the onion.
The appeal of blooming onions lies not only in their striking appearance but also in their crispy texture and rich flavor profile. When prepared correctly, the outer layers of the onion become golden brown and crunchy while the inner layers remain tender and juicy. This contrast creates a delightful eating experience, making it a favored choice for gatherings and celebrations.
Beyond their tasty exterior, blooming onions are perfect for sharing, encouraging a social atmosphere around the table. Whether as a starter or a side dish, they add a touch of fun and flair to any meal. However, traditional frying can be heavy and calorie-laden, which is where the air fryer comes into play. With its ability to deliver that same crispy texture with significantly less oil, the air fryer transforms this indulgent dish into a lighter, healthier option without compromising on taste.
Ingredients Overview
To create your crispy mini blooming onions, you’ll need a few key ingredients, each playing a crucial role in achieving the perfect flavor and texture. Here’s what you’ll need:
1. Mini Onions: The star of the dish, mini onions (also known as pearl onions) are smaller than their larger counterparts, making them ideal for blooming. They offer a sweeter flavor and a more delicate texture, which can enhance the overall eating experience.
2. Buttermilk: Soaking the onions in buttermilk not only tenderizes them but also helps the breading adhere better. The acidity in buttermilk breaks down the onion’s structure slightly, allowing for a more robust flavor absorption.
3. All-Purpose Flour: This will form the base of your breading. The flour provides a crispy coating once fried and helps to lock in moisture within the onion.
4. Cornstarch: Adding cornstarch to the flour mixture will enhance the crispiness of the breading. The combination creates a texture that is light and crunchy, perfect for blooming onions.
5. Spices: A blend of spices such as paprika, garlic powder, onion powder, cayenne pepper, and salt will elevate the flavor profile of the dish. Each spice brings a unique taste, adding depth and complexity to the final product.
6. Dipping Sauce: While not part of the blooming onion itself, a flavorful dipping sauce, such as a spicy ranch or zesty aioli, is essential for enhancing the overall experience. The sauce complements the crispy onion and adds an extra layer of flavor.
Ingredient Substitutions
For those with dietary restrictions or preferences, there are several substitutions that can be made without sacrificing flavor:
– Gluten-Free Option: Substitute all-purpose flour and cornstarch with a gluten-free flour blend to create a gluten-free version of this dish.
– Dairy-Free Option: Instead of buttermilk, you can use a plant-based milk like almond or soy milk mixed with a tablespoon of vinegar or lemon juice to mimic the acidity of buttermilk.
– Seasoning Variations: Feel free to adjust the spice blend according to your taste. Adding herbs like oregano or thyme, or even some grated Parmesan for a cheesy twist, can customize the flavor to suit your preferences.
Preparation Process
Now that we’ve covered the ingredients, let’s dive into the preparation process, which is where the magic happens. Follow these detailed steps to ensure your mini blooming onions turn out perfectly crispy and delicious.
Step 1: Preparing the Onions
Start by selecting your mini onions. Aim for onions that are firm and free from blemishes. Once you have your onions, it’s time to prepare them for blooming.
1. Peeling: Carefully peel the outer layers of the mini onions, ensuring you remove all of the dry skin. Take care not to remove the root end, as this will help hold the onion together during the blooming process.
2. Cutting: Using a sharp knife, make vertical cuts around the onion, starting about half an inch from the top and stopping just above the root. Aim for 8-12 cuts per onion, depending on their size. The goal is to create petals that will open up as they cook.
3. Soaking: Place the cut onions in a bowl of buttermilk. Ensure that the onions are fully submerged. The soaking process is crucial as it allows the onions to absorb moisture and flavor. Let them soak for at least 30 minutes to one hour. This not only enhances their taste but also helps ensure they bloom correctly during cooking.
Importance of Soaking Time
The soaking time in buttermilk is not just a suggestion; it’s essential for the flavor and texture of your blooming onions. The longer the onions soak, the more flavor they will absorb, resulting in a more delicious end product. Additionally, this step helps soften the onions slightly, making them easier to bloom and ensuring that they cook evenly.
Step 2: Creating the Perfect Breading
While the onions soak, you can prepare the breading mixture. This is a simple yet effective process that will enhance the crispy exterior of your mini blooming onions.
1. Mix Dry Ingredients: In a medium bowl, combine the all-purpose flour, cornstarch, and the spices (paprika, garlic powder, onion powder, cayenne pepper, and salt). Whisk the ingredients together until they are evenly mixed. This blend will provide a flavorful and crunchy coating.
2. Breading the Onions: After the soaking time is complete, remove the onions from the buttermilk and allow any excess liquid to drip off. Carefully dredge each onion in the flour mixture, ensuring that the flour gets into the crevices created by your cuts. This step is vital for getting that signature crunchy texture.
3. Second Coating: For an extra layer of crunch, you can double dip the onions. After the first breading, return the onions to the buttermilk briefly before dredging them again in the flour mixture. This will create a thicker coating that crisps up beautifully in the air fryer.
With your onions prepped and breaded, you’re now ready to move on to cooking them in the air fryer for that perfect crispy finish. The combination of the air fryer’s powerful circulation and the double coating will yield a deliciously crispy exterior and a tender, flavorful inside.
Stay tuned for the next part of this article, where we will discuss the cooking process, including tips for achieving the ideal texture and flavor in your crispy mini blooming onions!
Explanation of the Breading Process
Creating crispy mini blooming onions in the air fryer starts with a carefully crafted breading process. The key is to ensure that each onion is evenly coated, which contributes to both flavor and texture. Begin by preparing a seasoned flour mixture. This combination should include all-purpose flour, salt, pepper, garlic powder, and paprika. The seasoning is crucial; it infuses the onion with flavor and helps the breading stick.
Once your seasoned flour is ready, the next step involves dipping the onion into a wet mixture. This can be a simple blend of egg and milk or a plant-based alternative for a vegan option. The wet mixture acts as an adhesive for the breadcrumbs, ensuring that they cling well to the onion.
When it comes to the breadcrumbs, panko is the ideal choice. These Japanese-style breadcrumbs are lighter and airier than traditional breadcrumbs, which means they create a crispier texture when cooked. After dipping each onion in the wet mixture, coat it generously with panko breadcrumbs, pressing gently to ensure they adhere well. This two-step breading process – dry, then wet, and finally dry again – is what will give your mini blooming onions that sought-after crunch.
Air Frying Technique
Now that your mini blooming onions are breaded and ready, it’s time to dive into the air frying process. Preheating your air fryer is an essential first step; it ensures that the temperature is consistent and helps achieve that golden, crispy finish. Preheat the air fryer to 375°F (190°C) for about 5 minutes.
When it comes to cooking, avoid overcrowding the basket. Each mini blooming onion needs space for air to circulate around it; otherwise, they can end up steaming instead of frying. Depending on your air fryer’s capacity, you may need to cook in batches.
Place the breaded onions in the air fryer basket, making sure they are not touching. For an extra crispy finish, lightly spray each onion with cooking spray. This step is vital as it promotes browning and crunchiness. Cook them for about 10 to 12 minutes, flipping them halfway through to ensure even cooking. Keep an eye on them towards the end of the cooking time to prevent burning; every air fryer cooks slightly differently.
Tips for Achieving Maximum Crispiness and Flavor
– Season Generously: Don’t skimp on seasoning in the flour mixture. The flavor should penetrate the onion itself.
– Use Panko: Always opt for panko breadcrumbs for a superior crunch.
– Temperature Matters: Ensure your air fryer is fully preheated for optimal cooking.
– Avoid Overcrowding: Give each onion space in the basket for even cooking.
– Cooking Spray: A light mist of cooking spray is essential for achieving that perfect golden color and texture.
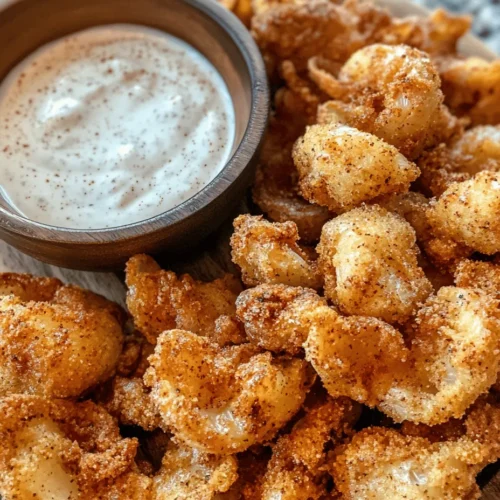
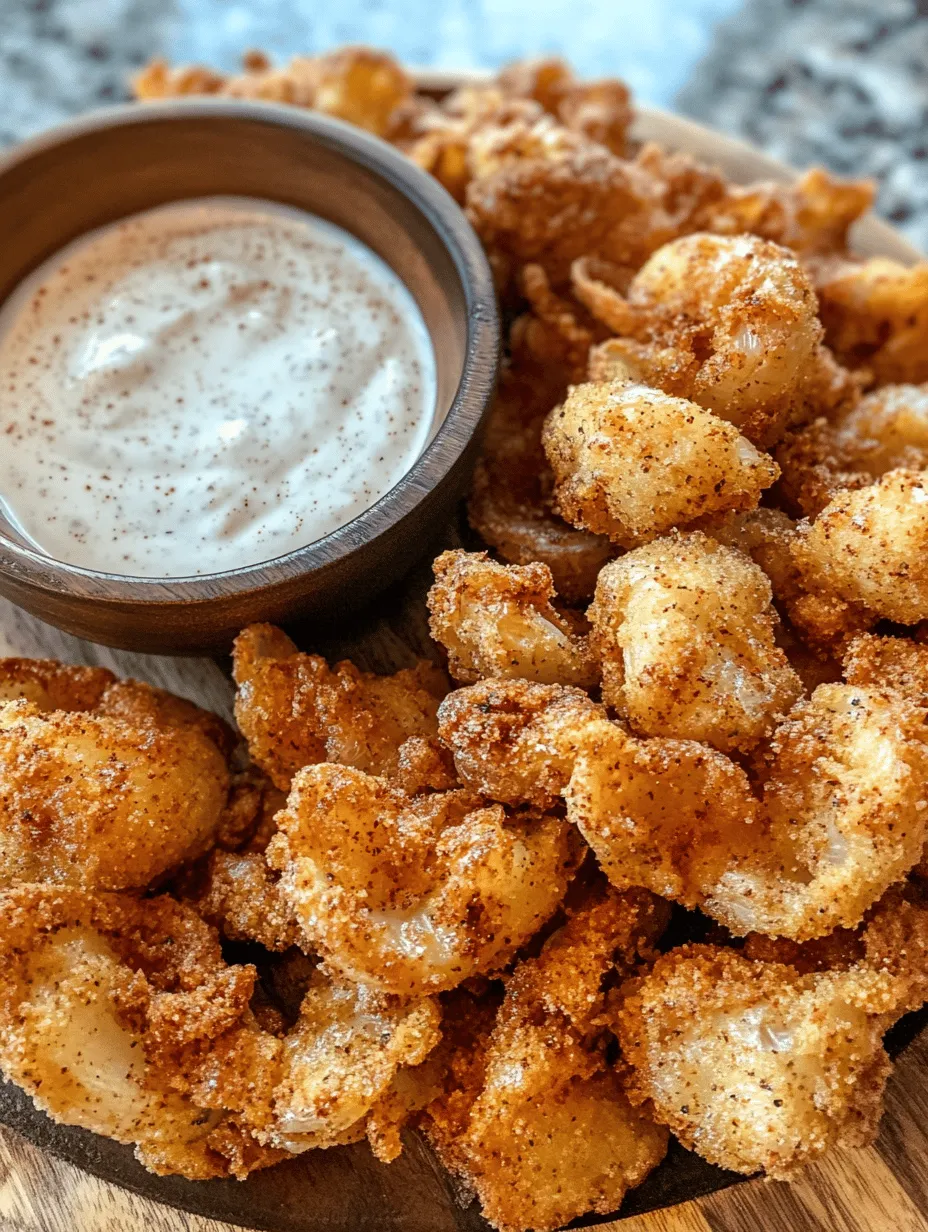
Serving Suggestions
Once your crispy mini blooming onions are ready, it’s time to think about how to serve them. These delightful bites are perfect as appetizers for gatherings and parties. Pair them with a variety of dipping sauces to elevate the experience. Classic ranch dressing is always a hit, but for a twist, consider serving them with spicy aioli or a tangy honey mustard.
Presentation is key when serving these mini blooming onions. Arrange them on a large platter with a selection of dipping sauces in small bowls around them. You can add garnishes such as fresh herbs or sliced vegetables to enhance the visual appeal.
These mini blooming onions are not just limited to appetizers; they can easily serve as a snack or even a side dish during a casual meal. Their versatility makes them suitable for any occasion, whether it’s game day, a family dinner, or a festive gathering.
Nutritional Information
When it comes to nutrition, air frying offers a healthier alternative to traditional frying. A standard serving of crispy mini blooming onions made in the air fryer is significantly lower in calories and fat compared to their deep-fried counterparts. Depending on the size of the onion and the ingredients used, one serving typically contains around 150-200 calories, with approximately 5-7 grams of fat.
Air frying also retains more nutrients in vegetables compared to deep frying, which can strip them of their beneficial properties. This recipe fits well into various dietary lifestyles, including vegetarian and gluten-free (when using gluten-free flour and panko).
Conclusion
In summary, making crispy mini blooming onions in the air fryer is a simple yet rewarding culinary experience. The combination of a well-seasoned breading and the air frying technique results in a deliciously crunchy snack that is sure to impress. The versatility of this dish, coupled with the ease of preparation, makes it a must-try for anyone looking to elevate their appetizer game.
We encourage you to experiment with different dipping sauces to discover your favorite flavor combinations. The joy of homemade appetizers lies not just in their taste, but in the experience of sharing them with friends and family. So gather your ingredients, fire up your air fryer, and enjoy the delightful crunch of these mini blooming onions that are perfect for any occasion!